


Table of Contents
ToggleOutdoor ground lighting does more than just brighten a yard after dark. It creates depth, highlights architectural features, and turns pathways into guided routes that improve both safety and curb appeal. Whether illuminating a stone walkway, accenting mature trees, or defining garden beds, ground-level fixtures provide functional visibility while adding layers of visual interest. The right placement and fixture choice can make a modest landscape feel intentional and polished. Understanding the differences between fixture types, voltage systems, and installation methods ensures the lighting plan delivers lasting performance without ongoing headaches.
Key Takeaways
- Outdoor ground lighting enhances safety, curb appeal, and property value by illuminating pathways and highlighting architectural features, with well-executed landscape lighting returning up to 50% of its cost at resale.
- Low-voltage (12V or 24V) systems are the best choice for most residential outdoor ground lighting projects, offering easier installation and lower operating costs than line-voltage systems.
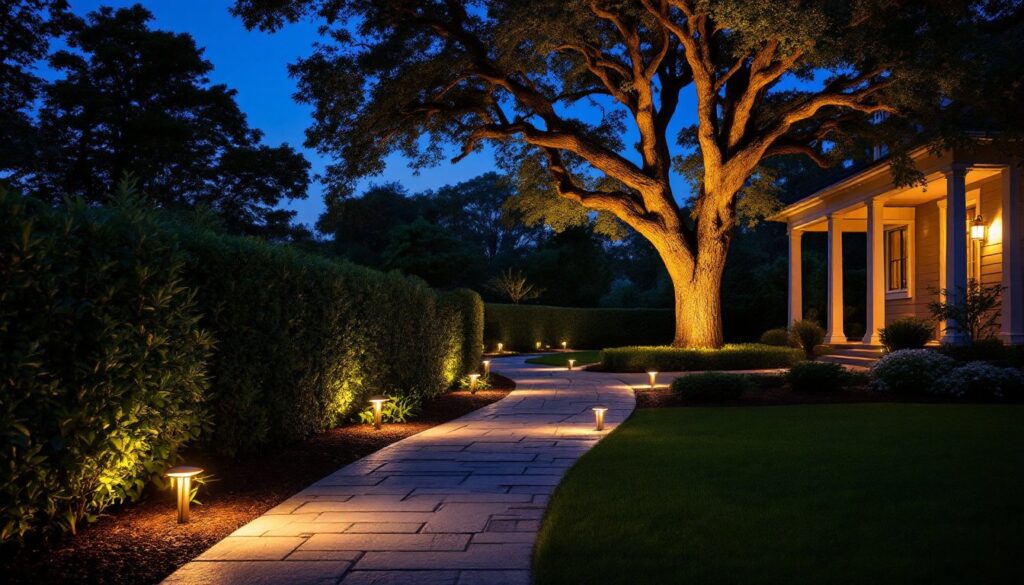
- In-ground well lights and path lights are the two primary fixture types: wells provide dramatic uplighting for trees and walls, while path lights guide circulation and improve nighttime visibility.
- LED fixtures significantly outperform halogen options, delivering 25,000–50,000 hours of lifespan, lower energy costs, and a faster payback period despite higher initial investment.
- Successful outdoor ground lighting design requires a lighting plan, proper fixture spacing (every 8–12 feet for pathways), layered effects combining uplights and path lights, and careful attention to voltage drop and waterproof connections.
- Avoid common installation mistakes like overloading transformers, using indoor-rated wire connectors, and skipping voltage tests, which can cause premature LED failure and reduce system performance.
What Is Outdoor Ground Lighting and Why Does It Matter?
Outdoor ground lighting refers to any fixture installed at or near ground level to illuminate pathways, landscape features, or architectural elements from below or at foot level. Unlike overhead floodlights or porch fixtures, ground lights direct illumination upward, across, or downward to create dramatic effects, guide movement, or improve nighttime visibility.
Safety is the primary driver. Well-lit walkways, steps, and entry points reduce trip hazards and deter potential intruders. A path light every 8–10 feet along a walkway provides consistent visibility without creating harsh shadows.
Curb appeal follows close behind. Strategic lighting draws attention to focal points, mature trees, stone walls, water features, or flowering beds, while downplaying service areas like trash bins or utility boxes. Uplighting a tree canopy or washing light across textured stone adds dimension that’s invisible during the day.
Property value benefits, too. A thoughtfully lit exterior signals maintenance and attention to detail, which appeals to buyers. According to the National Association of Realtors, well-executed landscape lighting can return up to 50% of its cost at resale.
Most residential ground lighting runs on low-voltage systems (12V or 24V), powered by a transformer that steps down standard 120V household current. Low-voltage systems are safer to install, easier to modify, and less expensive to run than line-voltage (120V) systems, which typically require a licensed electrician and conduit burial per National Electrical Code (NEC) Article 590.
Solar-powered fixtures offer simplicity, no wiring, no transformer, but output and runtime depend on sunlight exposure and battery capacity. They work well for accent lighting but rarely deliver the brightness needed for primary path illumination.
Types of Outdoor Ground Lighting for Every Landscape
In-Ground Well Lights
In-ground well lights (also called recessed uplights) install flush with the soil, pavers, or concrete, directing a focused beam upward. They’re the go-to choice for uplighting trees, columns, or walls.
Typical fixtures use MR16 or PAR36 LED lamps, rated between 3W and 9W, which provide ample brightness without excessive heat. Housing is usually die-cast brass, aluminum, or heavy-duty composite with a tempered glass lens rated for vehicle loads if installed in driveways (look for fixtures rated for 2,500+ lbs).
Installation requires digging a cavity sized to the fixture housing (usually 4–6 inches deep and 4–6 inches in diameter), ensuring the top sits flush with the finished grade. Run 12- or 14-gauge direct-burial landscape wire to the transformer location, keeping wire splices inside waterproof wire connectors rated for wet locations.
Beam angle matters. Narrow spots (10–20 degrees) create dramatic columns of light on tall trees or architectural elements. Wide floods (35–60 degrees) wash broader surfaces like garden walls or shrub masses. Homeowners with uplighting aspirations will benefit from mixing both beam types to create layered effects.
One caution: avoid aiming uplights directly at windows or neighboring properties. Glare becomes intrusive, and excessive upward light contributes to light pollution.
Path and Walkway Lights
Path lights stand 12–24 inches tall and cast a pool of light at ground level, typically using 1.5W to 5W LEDs. They’re spaced every 8–12 feet along walkways, driveways, or bed edges to define circulation routes.
Most use a stake mount that pushes directly into soil, making installation quick and forgiving. Better-quality fixtures include a removable stake that allows height adjustment or relocation without replacing the entire unit.
Materials range from plastic (budget-friendly but prone to UV degradation) to cast aluminum, copper, or brass (more durable and weather-resistant). Powder-coated finishes hold up better than paint in wet climates.
Look for fixtures with shielded lenses or louvers to prevent upward glare. A good path light illuminates the ground without blinding anyone walking toward it. Dark-sky-compliant fixtures meet International Dark-Sky Association (IDA) standards by directing light downward only.
Bollard lights, short, post-style fixtures 24–36 inches tall, work well in commercial or modern residential settings where taller profiles suit the design aesthetic. They provide higher output and can replace every other standard path light to reduce fixture count.
How to Choose the Right Outdoor Ground Lighting
Start with a lighting plan. Walk the property at dusk and note which areas feel unsafe, uninviting, or visually flat. Mark proposed fixture locations with landscape flags or spray paint. This hands-on approach prevents over-lighting (a common mistake) and identifies optimal angles before digging.
Voltage system choice hinges on scale and permanence. Low-voltage (12V) suits most residential projects up to 300 watts total load. A 300-watt transformer can power roughly twenty 15W fixtures or forty 7.5W fixtures, depending on wire run lengths and voltage drop.
Line-voltage (120V) systems make sense for large properties, commercial installations, or areas requiring brighter output. They demand GFCI protection, conduit burial 18–24 inches deep (per NEC 300.5), and often a permit. Hire a licensed electrician unless well-versed in code-compliant electrical work.
LED vs. halogen: LEDs win on efficiency, lifespan (25,000–50,000 hours vs. 2,000–4,000 for halogen), and heat output. Halogen lamps run hotter, consume more power, and require frequent replacement. Initial LED cost is higher, but payback happens within two years on energy savings alone.
Color temperature affects ambiance. 2700K–3000K (warm white) mimics incandescent bulbs and suits traditional landscapes. 3500K–4000K (neutral white) provides clearer visibility for paths and security. 5000K+ (cool white) feels clinical and is rarely appropriate for residential landscapes.
Materials and finish: Brass and copper develop a natural patina over time, blending into garden settings. Powder-coated aluminum resists corrosion in coastal or high-moisture climates. Stainless steel suits contemporary designs. Avoid fixtures with exposed fasteners or thin-gauge metal, they’ll corrode or deform within a few seasons.
IP rating (Ingress Protection) indicates weather resistance. IP65 (dust-tight, water-jet resistant) is the minimum for most outdoor ground fixtures. IP67 (submersion-resistant) is necessary for fixtures in low-lying areas prone to standing water.
Step-by-Step Installation Guide for Ground Lighting
Tools and materials:
- Low-voltage transformer (sized to total fixture wattage + 20% headroom)
- 12- or 14-gauge direct-burial landscape wire (copper, not aluminum)
- Wire strippers and connectors (waterproof, grease-filled wire nuts or heat-shrink splice connectors)
- Trenching spade or flat-edge shovel
- Voltage meter (to check voltage drop)
- Safety glasses, work gloves
Installation steps:
-
Mount the transformer near a GFCI-protected outdoor outlet. Most transformers include a photocell or timer: mount it where the sensor has an unobstructed view of natural light (avoid eaves or shaded corners).
-
Lay out the wire run from the transformer to each fixture location. Keep the primary wire run as short as possible to minimize voltage drop. For runs longer than 100 feet, consider a multi-tap transformer with multiple output terminals at different voltages (12V, 13V, 14V, 15V) to compensate for drop over distance.
-
Dig trenches 6–8 inches deep along the wire path. Use a flat spade to create a narrow slit rather than a wide trench, easier to backfill and less disruptive to turf. Lay the wire in the bottom of the trench, avoiding sharp bends or kinks.
-
Install fixtures per manufacturer instructions. For in-ground wells, dig the cavity, set the fixture level with the finished grade, and backfill around the housing with soil or pea gravel for drainage. Stake-mounted path lights push directly into undisturbed soil: if the ground is hard, wet it lightly or pre-drill a pilot hole.
-
Connect wires using waterproof connectors. Strip ½ inch of insulation, twist the strands together, and secure with a grease-filled wire nut or heat-shrink connector. Never leave bare wire exposed. Tuck connections under mulch or inside the fixture base if space allows.
-
Test the system before backfilling trenches. Turn on the transformer and check each fixture. Use a voltage meter to measure output at the farthest fixture, it should read no less than 10.8V (a 10% drop from 12V is acceptable: more than that indicates undersized wire or too many fixtures on one run).
-
Backfill trenches and tamp soil lightly to avoid settling. Water the area to help soil compact naturally.
Common mistakes to avoid:
- Overloading a single transformer tap (divide fixtures across multiple runs or taps)
- Using indoor-rated wire connectors (they’ll corrode within months)
- Burying wire too shallow (frost heave or foot traffic can damage it)
- Skipping the voltage test (voltage drop causes dim fixtures and premature LED failure)
For detailed project walkthroughs on similar builds, Instructables offers community-tested guides with photos and troubleshooting tips.
Design Tips to Maximize Curb Appeal and Functionality
Layer the lighting. Combine uplights, path lights, and downlights to create depth. A single layer of path lights along a walkway feels flat: adding uplights on nearby trees or wall wash on a fence introduces dimension.
Highlight focal points, not everything. Select three to five key features, a specimen tree, an entry door, a water feature, and illuminate those. Over-lighting makes a yard feel like a parking lot.
Use the 3:1 ratio for accent lighting. The illuminated object should be at least three times brighter than its surroundings to create visual contrast. A 7W uplight on a tree trunk achieves this in most settings.
Avoid spacing fixtures evenly like runway lights. Vary distances based on landscape rhythm and sight lines. Clusters of two or three fixtures near an entry create a welcoming glow: single fixtures spaced irregularly along a path feel more organic.
Match fixture style to architecture. Craftsman homes pair well with copper or bronze lantern-style path lights. Modern builds suit sleek, minimalist bollards or flush-mount wells. Cottage gardens call for shorter, decorative path lights with textured lenses.
Consider seasonal changes. Deciduous trees that look dramatic when lit in summer may lose impact in winter. Evergreens, architectural features, and hardscaping provide year-round visual interest.
Adjust beam angles after installation. Many in-ground fixtures include adjustable lamps or housings. Test different angles at night to find the most flattering uplighting effect, sometimes a slight shift eliminates harsh shadows or glare.
Mind the neighbors. Point fixtures away from property lines and bedroom windows. A well-lit yard shouldn’t impose on adjacent homes.
For broader inspiration on balancing aesthetics and function in outdoor spaces, The Spruce provides seasonal guides on landscape design and lighting trends. Homeowners exploring complementary overhead options may find that bistro lighting works well in tandem with ground fixtures to create a layered, inviting ambiance for entertaining areas.